As we provide stylish labels widget for blogger blog now, we are going to tell you about some stylish search boxes for blogger blog.The search box is very important for every type of blogs because it allow your visitors to search on your blog and find anything that they need.
You can see the live demo of this widget in a sidebar of our template.
How To Add Search Box Widget In Blogger.
To Add this gadget to your Blogger template, please follow the below steps.
- First Copy the codes of any search box that are given below.
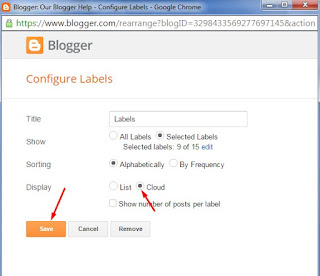
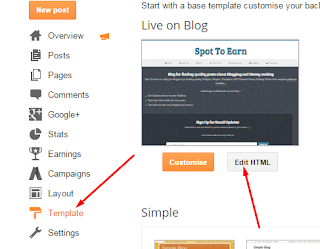
- Go to your blog dashboard.
- Go to Layout.
- Click on add gadget in sidebar or footer where you want to show this.
- A new window will open.
- In the new window click on HTML?Java scripts
- Paste You codes in content box and hit click on save.
- Done! Go to your blog and see a result.
 |
| Before Mouse Hover |
 |
After Mouse Hover Effect<style>#nbc-searchexpandbox1{padding:10px;}#nbc-searchexpandsubmit1{border:1px solid #111111;background: #111111;padding:5px;color:#ffffff;font:14px verdana;}#nbc-searchexpandinput1{-moz-border-radius: 10px;-khtml-border-radius: 10px;-webkit-border-radius: 10px;border:1px solid #dcdcdc;background:#ffffff;padding:5px;color:#888888;font:14px verdana;transition: width 2s;-webkit-transition: width 2s; /* Safari */-o-transition: width 2s; /* Opera*/-moz-transition: width 2s; /* firefox*/width:65px;}#nbc-searchexpandinput1:hover{width:200px;}</style><div id='nbc-searchexpand1'> <form expr:action='/search/max-results=8' method='get' id="nbc-searchexpandbox1"> <input name='q' id='nbc-searchexpandinput1' onblur='if (this.value == "") {this.value = "Search this site...";}' onfocus='if (this.value == "Search this site...") {this.value = ""}' type='text' value='Search this site...'/> <input id='nbc-searchexpandsubmit1' type='submit' value='Search'/> </form> </div> |

<style>fieldset, form, label, legend,table, caption, tbody, tfoot, thead, tr, th, td,article, aside, canvas, details, figcaption, figure,footer, header, hgroup, menu, nav, section, summary,time, mark, audio, video { margin: 0; padding: 0; border: 0; font: inherit; vertical-align: baseline;}/*-------------SEARCH-------------*/#searchForm fieldset { width:240px; position:relative; display:block;}div.input { width:120px; padding:5px 15px 7px 15px; border-radius:20px; border:1px solid #c6d2db; border-top:1px solid #b4c1cb; box-shadow:inset 0 1px 2px rgba(0,0,0,0.08); float:right; background:#e8edf1;} div.input.focus { border:1px solid #9ecbe2; box-shadow:0 0 6px #abdcff, inset 0 1px 2px rgba(0,0,0,0.08); }input#s { width:100%; border:0; border-radius:20px; background:transparent; height:16px; color:#b4bdc4; text-shadow:0 1px 1px #fff;} input#s:focus { outline:none }input#searchSubmit { width:19px; height:19px; text-indent:-9999px; overflow:hidden; background:url(../images/search-icon.png) no-repeat; border:0; position:absolute; top:7px; right:13px; z-index:5; display:none; cursor:pointer;}</style> <div id="main"> <form id="searchForm" action="/search"> <fieldset> <div class="input"> <input type="text" name="q" id="s" placeholder="Enter your search" /> </div> <input type="submit" id="searchSubmit" value="" /> </fieldset> </form> </div><script src="http://ajax.googleapis.com/ajax/libs/jquery/1.5.1/jquery.min.js"></script> <script src="http://pastebin.com/raw.php?i=J6Kpa2Pf"></script> <script src="http://pastebin.com/raw.php?i=yu6FUA1L"></script>
Search box for blogger with color changing effect
<div class="flexsearch"> <div class="flexsearch--wrapper"> <form class="flexsearch--form" action="/search" method="get"> <div class="flexsearch--input-wrapper"> <input class="flexsearch--input" type="text" placeholder="search here..." name="q" /> </div> <input class="flexsearch--submit" type="submit" value="➜"/> </form> </div></div><style>/*********************** * Essential Structure * ***********************/.flexsearch--wrapper { height: auto; width: auto; max-width: 100%; overflow: hidden; background: transparent; margin: 0; position: static;} .flexsearch--form { overflow: hidden; position: relative;} .flexsearch--input-wrapper { padding: 0 66px 0 0; /* Right padding for submit button width */ overflow: hidden;}.flexsearch--input { width: 100%;}/*********************** * Configurable Styles * ***********************/.flexsearch--input { -webkit-box-sizing: content-box; -moz-box-sizing: content-box; box-sizing: content-box; height: 40px; padding: 0 46px 0 10px; border-color: #888; border-radius: 35px; /* (height/2) + border-width */ border-style: solid; border-width: 3px; margin-top: 15px; color: #333; font-family: 'Helvetica', sans-serif; font-size: 26px; -webkit-appearance: none; -moz-appearance: none;} .flexsearch--submit { position: absolute; right: 0; top: -10px; display: block; width: 60px; height: 60px; padding: 0; border: none; margin-top: 20px; /* margin-top + border-width */ margin-right: 5px; /* border-width */ background: transparent; color: #888; font-family: 'Helvetica', sans-serif; font-size: 27px; line-height: 60px;}.flexsearch--input:focus { outline: none; border-color: #2288bb;}.flexsearch--input:focus.flexsearch--submit { color: #333; }.flexsearch--submit:hover { color: #2288bb; cursor: pointer;}::-webkit-input-placeholder { color: #888; }input:-moz-placeholder { color: #888}</style>You can change the orange text with your text.
Pure Clean Search Box
We are also using this box on your blog.

<style>#searchbox { background: #d8d8d8; border: 4px solid #e8e8e8; padding: 20px 10px; width: 260px;}input:focus::-webkit-input-placeholder { color: transparent;}input:focus:-moz-placeholder { color: transparent;}input:focus::-moz-placeholder { color: transparent;}#searchbox input { outline: none;}#searchbox input[type="text"] { background: url(https://blogger.googleusercontent.com/img/b/R29vZ2xl/AVvXsEgZigraXTuxxVhpqtsA5cGV6lB2OA4GXgK-drTkF_7PC-vVo1tRCVM0q1V0UR84l3J4c6a5t4Mt3lHqCR_PKxYnHDaeDx-jtJBc0e0II2ngj6iOJ5aGE_eiswFOqcgS06-ld-om2_s-amh0/s1600/search-dark.png) no-repeat 10px 6px #fff; border-width: 1px; border-style: solid; border-color: #fff; font: bold 12px Arial,Helvetica,Sans-serif; color: #bebebe; width: 55%; padding: 8px 15px 8px 30px;}#button-submit { background: #6A6F75; border-width: 0px; padding: 9px 0px; width: 23%; cursor: pointer; font: bold 12px Arial, Helvetica; color: #fff; text-shadow: 0 1px 0 #555;}#button-submit:hover { background: #4f5356;}#button-submit:active { background: #5b5d60; outline: none;}#button-submit::-moz-focus-inner { border: 0;}</style><form id="searchbox" method="get" action="/search"><input name="q" type="text" size="15" placeholder="Type here..." /><input id="button-submit" type="submit" value="Search" /></form>
just Clean Search Box

<style>#nbc-searchsimplebox1{padding:10px;}#nbc-searchsimplesubmit1{border:1px solid orange;background: orange;padding:5px;color:#ffffff;font:14px verdana;}#nbc-searchsimpleinput1{-moz-border-radius: 10px;-khtml-border-radius: 10px;-webkit-border-radius: 10px;border:1px solid #dcdcdc;background:#ffffff;padding:5px;color:#888888;font:14px verdana;}</style><div id='nbc-searchsimple1'> <form expr:action='/search/max-results=8' method='get' id="nbc-searchsimplebox1"> <input name='q' id='nbc-searchsimpleinput1' onblur='if (this.value == "") {this.value = "Search this site...";}' onfocus='if (this.value == "Search this site...") {this.value = ""}' type='text' value='Search this site...'/> <input id='nbc-searchsimplesubmit1' type='submit' value='Search'/> </form> </div>Search Box With Color Changing Button
This one is also clean and with go button, button will change its color on mouse hover

<style>
.form-wrapper {
width: 95%; padding: 8px;
margin: 100px auto;
overflow: hidden;
border-width: 1px;
border-style: solid;
border-color: #dedede #bababa #aaa #bababa;
box-shadow: 0 3px 3px rgba(255,255,255,.1), 0 3px 0 #bbb, 0 4px 0 #aaa, 0 5px 5px #444;
border-radius: 10px;
background-color: #f6f6f6;
background-image: linear-gradient(top, #f6f6f6, #eae8e8);
}
.form-wrapper #search {
width: 89%;
height: 20px;
padding: 10px 5px;
float: left;
font: bold 16px 'lucida sans', 'trebuchet MS', 'Tahoma';
border: 1px solid #ccc;
box-shadow: 0 1px 1px #ddd inset, 0 1px 0 #fff;
border-radius: 3px;
}
.form-wrapper #search:focus {
outline: 0;
border-color: #aaa;
box-shadow: 0 1px 1px #bbb inset;
}
.form-wrapper #search::-webkit-input-placeholder {
color: #999;
font-weight: normal;
}
.form-wrapper #search:-moz-placeholder {
color: #999;
font-weight: normal;
}
.form-wrapper #search:-ms-input-placeholder {
color: #999;
font-weight: normal;
}
.form-wrapper #submit {
float: right;
border: 1px solid #00748f;
height: 42px;
width: 100px; padding: 0;
cursor: pointer;
font: bold 15px Arial, Helvetica;
color: #fafafa;
text-transform: uppercase;
background-color: #0483a0;
background-image: linear-gradient(top, #31b2c3, #0483a0);
-moz-border-radius: 3px;
-webkit-border-radius: 3px;
border-radius: 3px;
text-shadow: 0 1px 0 rgba(0, 0 ,0, .3);
box-shadow: 0 1px 0 rgba(255, 255, 255, 0.3) inset, 0 1px 0 #fff;
}
.form-wrapper #submit:hover,
.form-wrapper #submit:focus {
background-color: #31b2c3;
background-image: linear-gradient(top, #0483a0, #31b2c3);
}
.form-wrapper #submit:active {
outline: 0;
box-shadow: 0 1px 4px rgba(0, 0, 0, 0.5) inset;
}
.form-wrapper #submit::-moz-focus-inner {
border: 0;
}
</style>
<form class="form-wrapper">
<input type="text" id="search" placeholder="Search this site here...." name="q" required /> <input type="submit" value="go" id="submit" />
</form>
So these were searched boxes for you I hope you enjoy this and get one of them for your blog .If facing any problem let me know.


